How to Organize a Laundry Room: 20 Ideas That Actually Work
You want to walk into the laundry room, start a load, and walk back out in under a minute. No digging for the stain spray. No stepping over a heap of towels to reach the dryer.
For most of us, that’s not how it goes. The hamper overflows by Wednesday. Detergent drips down the side of the jug. Clean clothes sit in a basket on top of the dryer until someone needs a shirt and pulls one from the pile.
The room usually isn’t too small. It just has no system. Every bottle, basket, and stray sock is waiting for someone to decide where it lives.
That’s what this list is for. If you’ve been wondering how to organize a laundry room so it actually stays neat, these 20 ideas cover every spot: the floor, the wall above the machines, the gap at the side, the door, the cabinets, and even the schedule you keep. Pick the corner that bugs you most and start there.
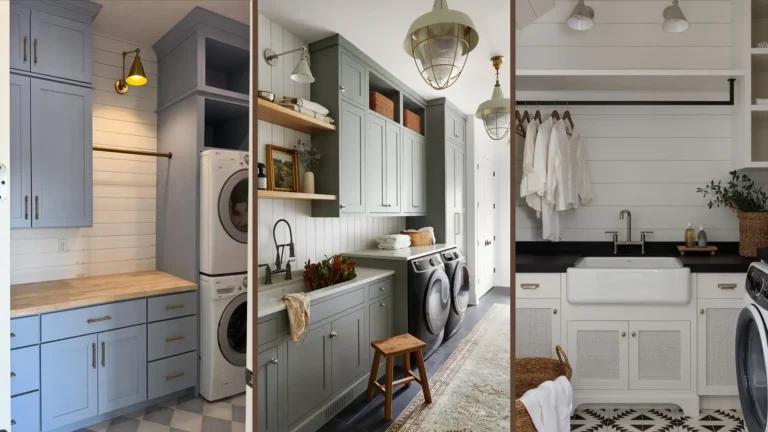
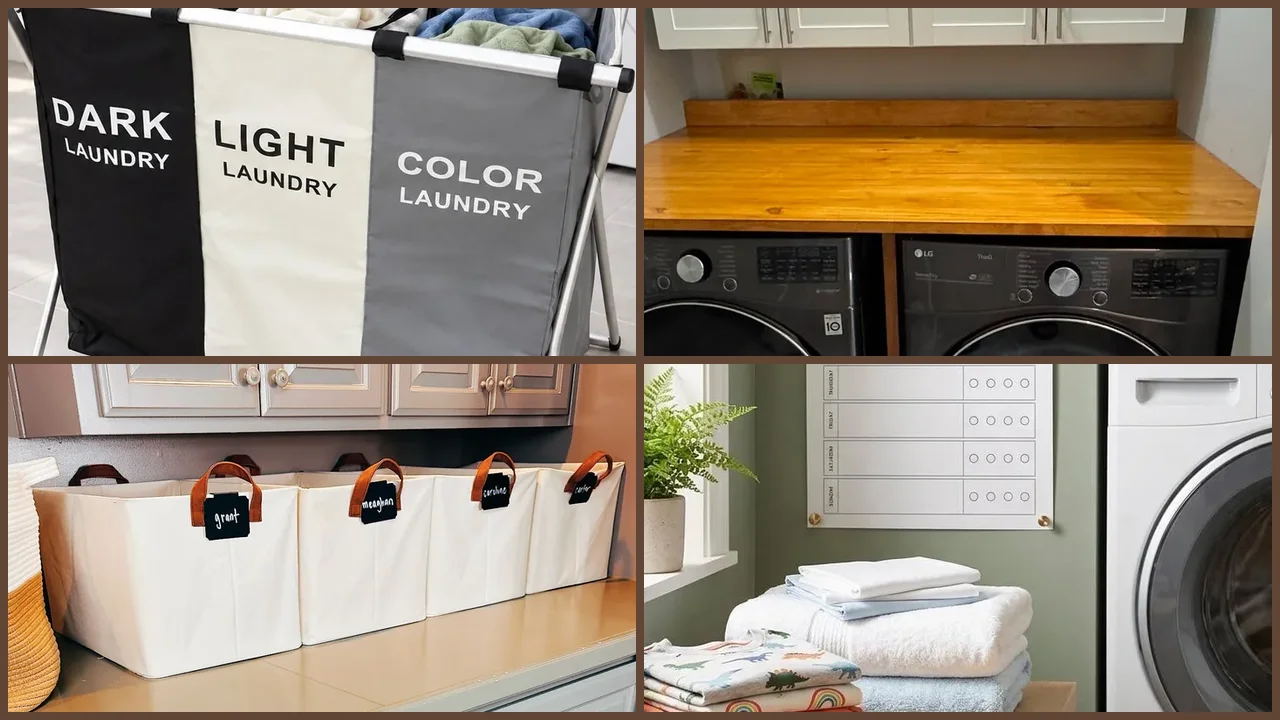
1. Set Up a Three-Bin Sorting Station
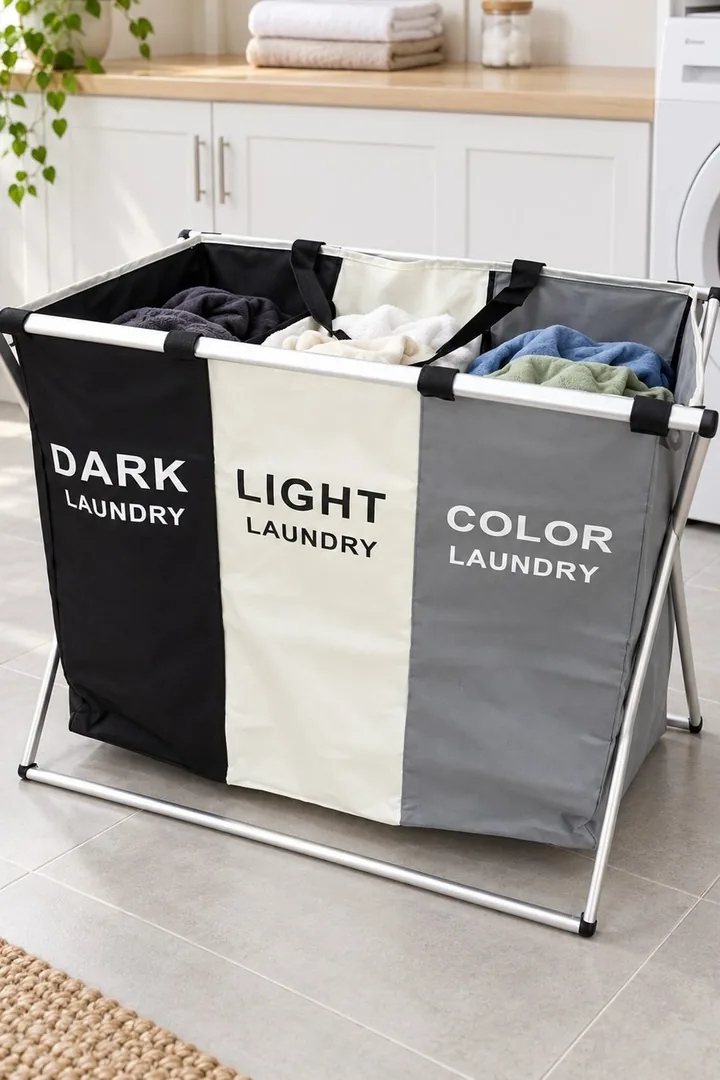
Most people sort laundry on wash day, bent over a big pile on the floor. That’s the slowest way to do it.
A three-bin sorter moves the job to the moment clothes come off. Each piece goes straight into the right section, and once a bag fills up, you have a load ready to go.
Look for:
- Bags that lift off the frame and have handles, so you can carry one right to the washer
- A frame that folds flat when you need the floor space back
- Bag colors that match their job, like black for darks and cream for whites
Park it where people actually undress, or just inside the laundry room door. If it’s out of the way, clothes end up on the floor anyway.
2. Add Shelves Above the Washer and Dryer
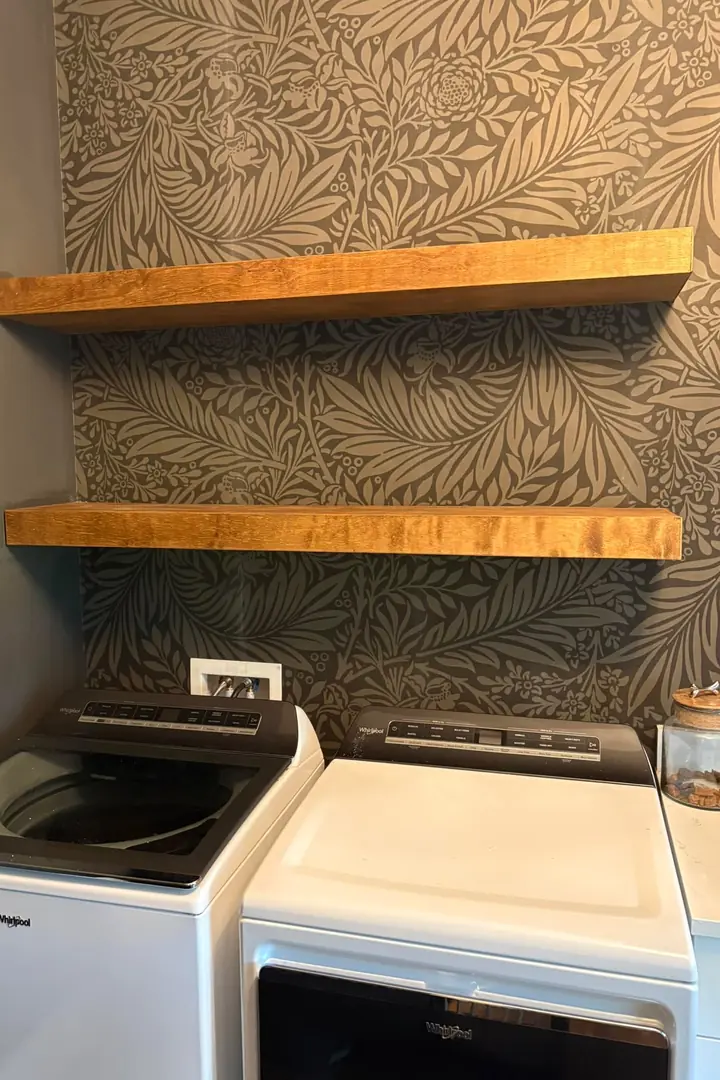
Two thick wood shelves in a warm honey stain, set against dark leafy wallpaper. It’s a simple setup, and it finally gives the wall above the machines a job.
Floating shelves keep things clean because there are no brackets to dust around. Chunky ones look solid against a busy print, and they’re deep enough for full-size jugs.
Split the shelves by how often you reach for things:
- Bottom shelf: what you grab every single load
- Top shelf: refills, spare towels, and backups
Screw them into wall studs or use anchors rated for the weight. Full detergent jugs get heavy fast.
💡 Quick Tip
Have a top-loader? Open the lid all the way before you mark the wall. The bottom shelf needs to sit above the open lid with a few inches to spare, or you’ll knock bottles off every time you load.
3. Pour Detergent Into Clear Jars
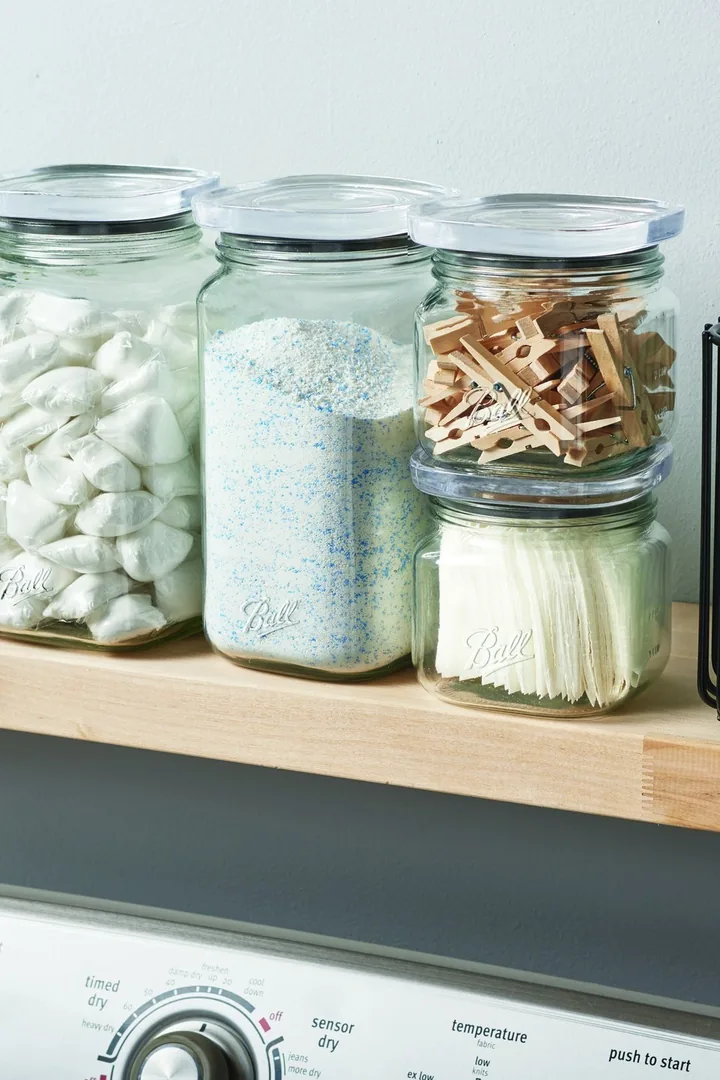
You can see when you’re running low before you actually run out. That alone makes clear jars worth it.
Square jars are a smart pick because they sit flush side by side and waste less shelf space than round ones. Wide mouths help too, since you’ll often be scooping with one hand while holding a shirt in the other.
Good things to move into jars:
- Powder detergent, with a small scoop kept inside
- Wooden clothespins
- Dryer sheets, stacked flat
If the lids are flat, stack the shorter jars two high. Lined up on a light wood shelf, plain everyday supplies look neat enough to leave out.
Cut the dosing info off the box and tape it to the back of the jar.
Dry the jar completely before refilling so powder doesn’t clump.
Keep a scoop in the jar so nobody guesses the amount.
Putting detergent pods in a clear jar on a low shelf where kids can see and reach them.
Moving bleach or strong cleaners out of their original bottles.
Pouring liquid detergent into jars without a spout. It drips everywhere.
4. Slide a Rolling Cart Into the Side Gap
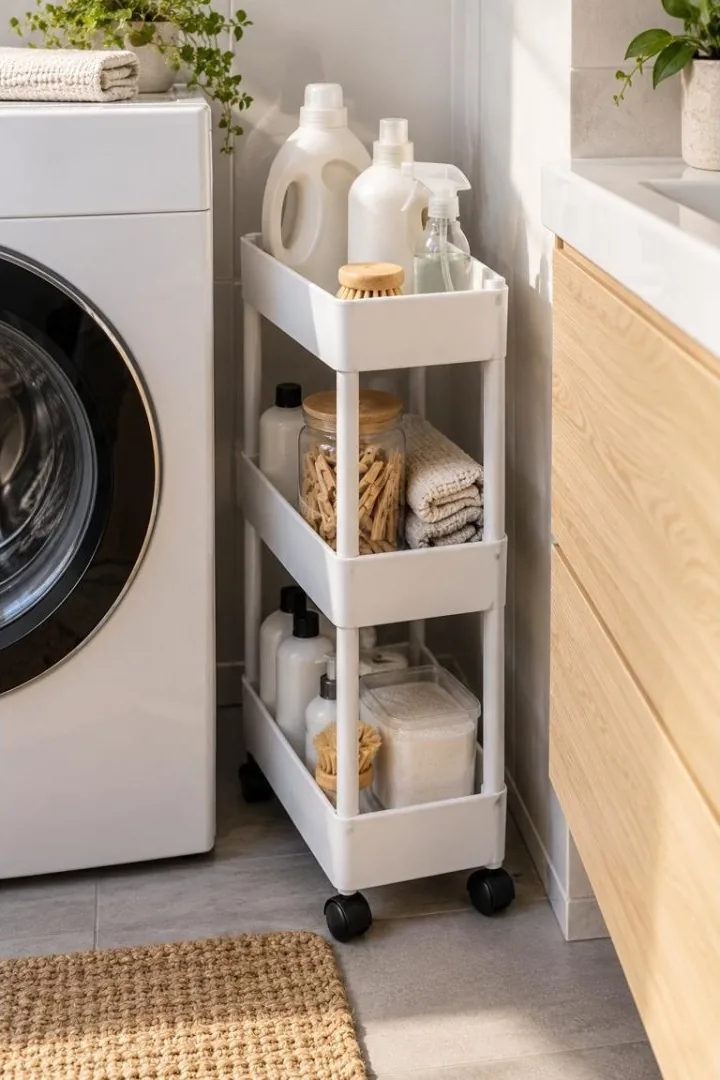
Here’s a simple rule: any gap you can slide your arm into is storage you’re not using.
The thin space between the washer and the wall usually collects dust and the odd dryer sheet. A narrow cart on wheels fits right in and rolls out when you need it. White is the easy pick next to a white machine. It blends in, so the corner looks tidy even when every shelf is full.
Load it from top to bottom:
- Top: the bottles you use every load, plus a spray and a scrub brush
- Middle: rolled hand towels and a jar of clothespins
- Bottom: heavy refills, so the cart stays steady
Once a month, roll it out and sweep behind it. You’ll be surprised what’s back there.
Before you buy the cart
5. Build a Folding Counter on Top
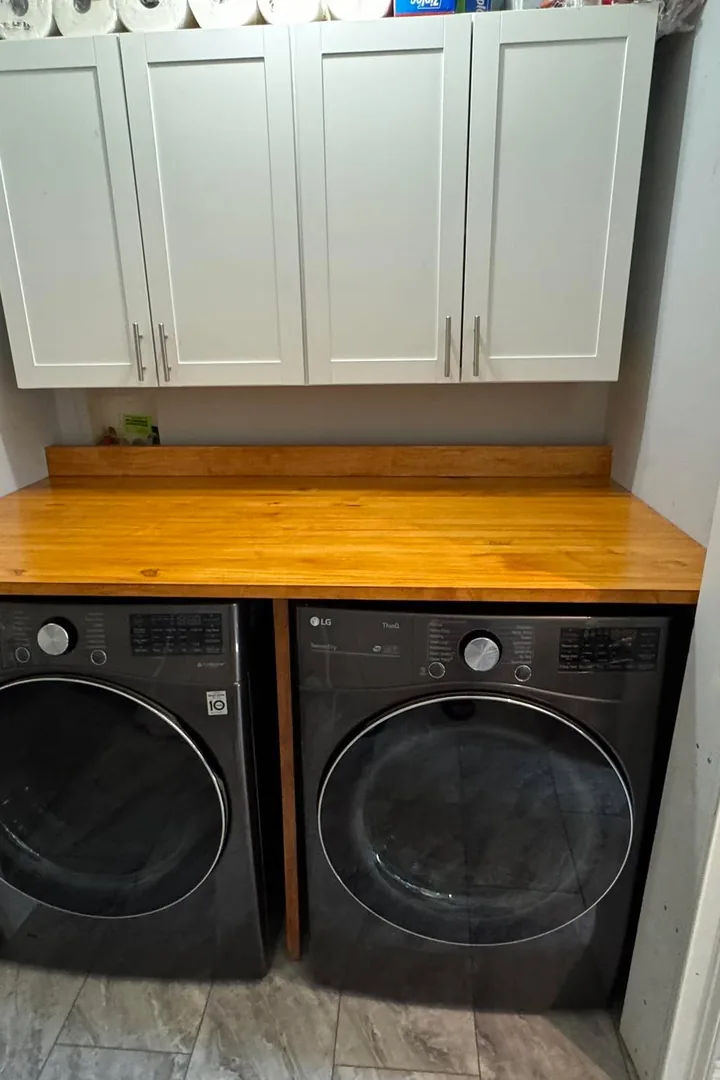
Laundry gets folded wherever there’s a flat spot. In a lot of homes, that means the bed, the couch, or the top of a dryer that’s still running.
A wood counter over front-load machines gives folding a real home. This one has two smart details worth copying:
- A thin support panel between the washer and dryer, so the counter rests on its own frame instead of on shaking machines
- A short lip along the back that stops socks and dryer sheets from sliding into the gap behind
Seal the wood with a water-resistant finish. Leave a little space between the counter and the machines so you can pull them out for repairs. Cabinets above can hold the bulky stuff, like paper towels and spare detergent.
6. Hang a Rod for Drip-Dry Clothes
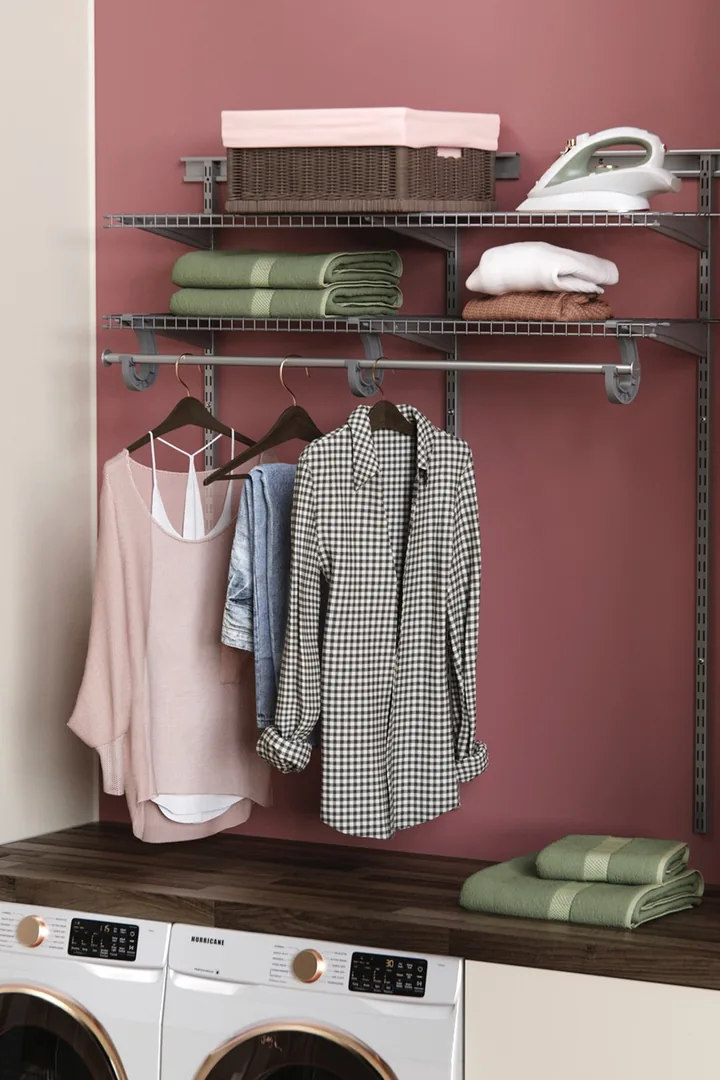
Some clothes come out of the washer with nowhere to go. A silky blouse can’t go in the dryer, and a button-up shirt wrinkles the second it lands in a basket.
A hanging rod fixes that. Mount it just under your shelves, so wet clothes hang straight while the shelf above holds folded towels, a lidded basket, or the iron.
Set it up so it works:
- Hang the rod high enough that long shirts clear the counter.
- Choose wooden or sturdy plastic hangers that won’t bend under a wet shirt.
- Leave a gap between hangers so air can move around each piece.
Heavy knit sweaters are the exception. They can stretch out on a hanger, so dry those flat.
| Tension Rod | Mounted Rod | |
|---|---|---|
| Setup | Twists tight between two walls, no tools | Screws into studs or a shelf track |
| Holds | A few light shirts at a time | A full row of wet clothes |
| Best spot | A nook between walls or cabinets | An open wall under shelves |
| Good pick if | You want a quick fix today | You hang-dry clothes every week |
7. Use the Back of the Door
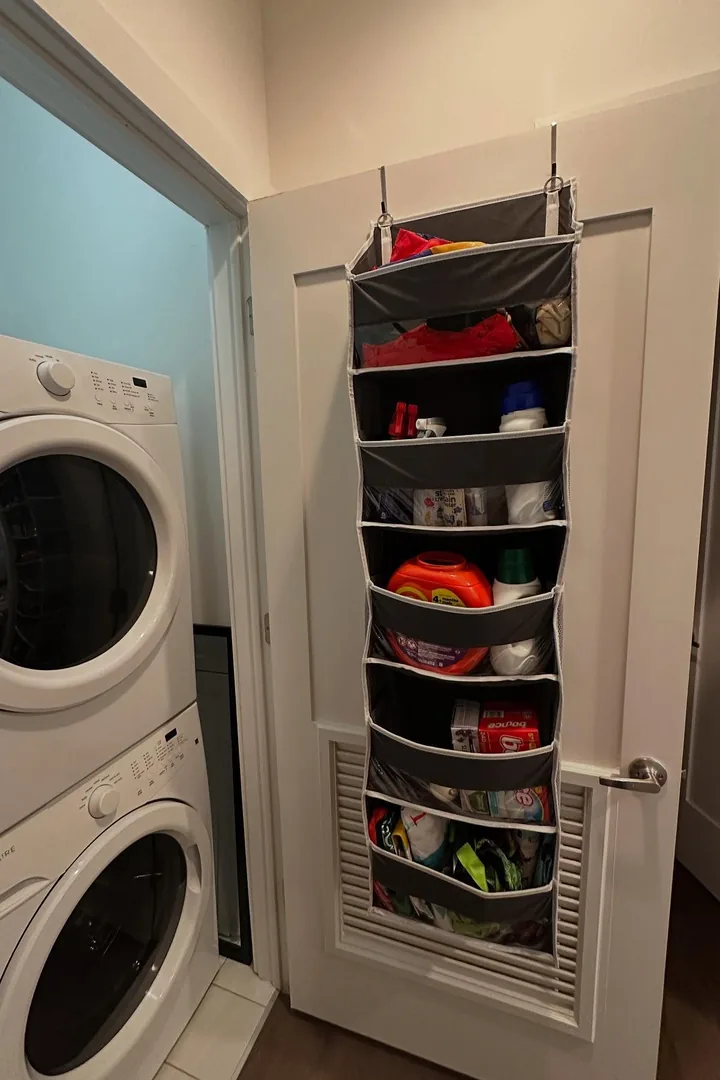
The laundry closet door swings open, and the stacked washer and dryer fill almost every inch. No shelf, no counter, and no place to set the stain spray.
So the supplies move to the door. A hanging fabric organizer with deep pockets hooks over the top and puts the whole back of the door to work. The soft sides don’t bang when the door closes.
Fill it in this order:
- Top pockets: detergent pods and anything kids shouldn’t reach
- Middle pockets: daily bottles and dryer sheets
- Bottom pockets: rags, refills, and spare clothespins
Try not to overstuff it. A heavy organizer makes the door drag and harder to close.
Bottles crowded on the floor beside the washer, a box of dryer sheets tipped over, and the stain spray rolled somewhere behind the machine.
Every bottle has its own pocket on the door. The floor stays clear, and you can see what’s running low the moment you open the closet.
8. Hang a Pegboard for Small Supplies
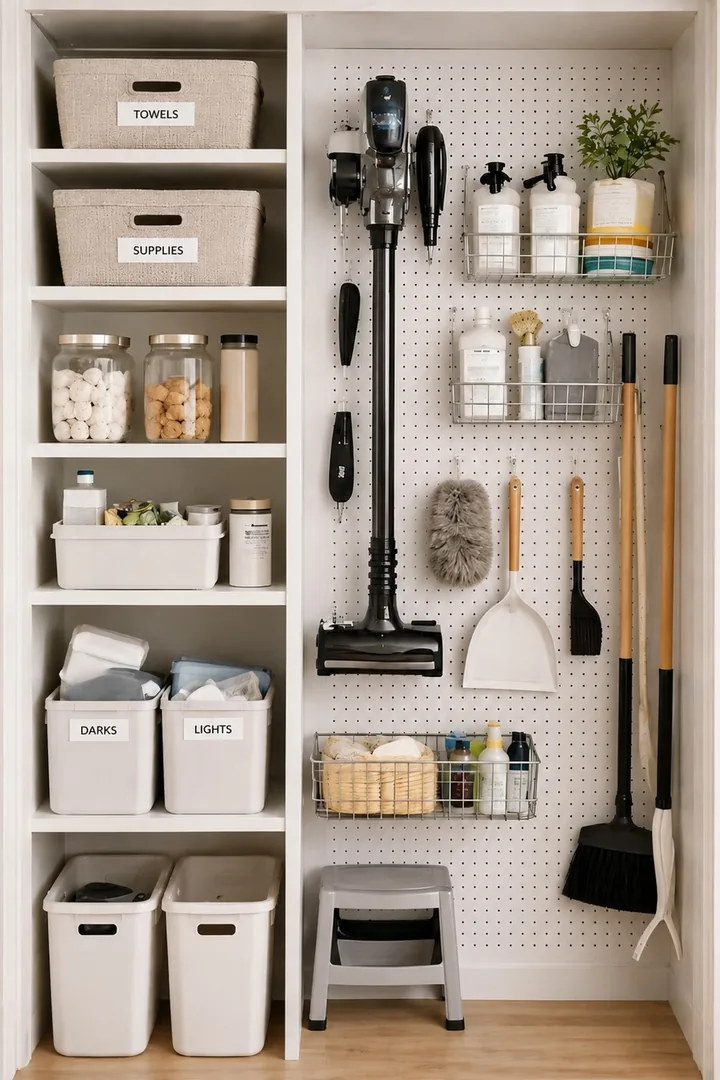
Hang the vacuum first. Everything else on a pegboard wall fits around your biggest tool.
Pegboard works because nothing on it is permanent. Hooks and wire baskets slide into any hole, so you can rearrange the whole wall in minutes when your tools change.
This closet groups things by job:
- Tall tools like the broom and mop along one edge
- Wire baskets of bottles and refills up high
- The duster and dustpan at arm height, where they’re quick to grab
White pegboard keeps a small closet bright. Keep a little step stool underneath so the top baskets stay easy to reach.
Screw thin wood strips into the wall studs first. The board needs a small gap behind it so hooks can slip through the holes.
Lay your tools on the floor in the shape of the board to plan the layout before you hang anything.
Give a cordless vacuum its own wall mount screwed through the board into a stud. Pegboard hooks alone aren’t made for that weight.
Add small hook clips or locks so hooks don’t pop out every time you grab the broom.
9. Give Everyone Their Own Basket
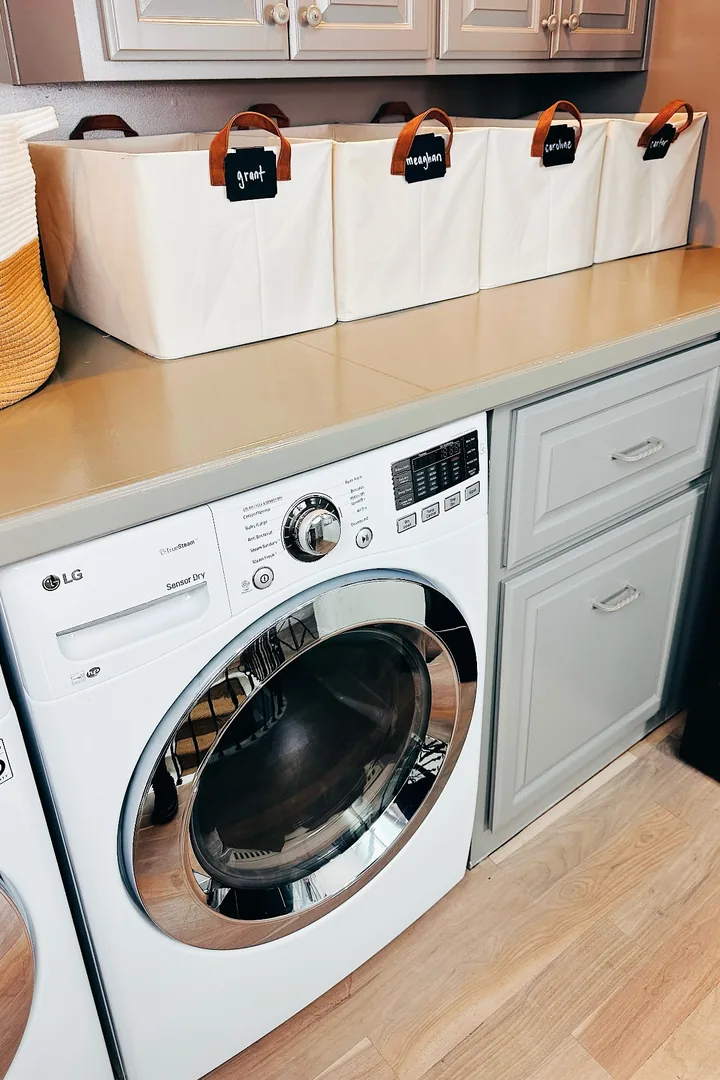
Folding isn’t the hard part of laundry. Putting it all away is.
Clean clothes tend to sit in one big basket until everyone digs through it for socks. One bin per person ends that. Fold straight into the right bin, and each person carries their own back to their room.
What makes this setup work:
- Canvas bins with sturdy handles, light enough for kids to carry
- Chalkboard tags you can wipe and rewrite as kids grow or guests stay over
- A spot on the counter above the machines, right where folding happens
Cream bins look soft against gray cabinets, and the tan handles pick up the warm wood floor.
The bin comes back to the laundry room empty. If it stays in a bedroom, it turns into a second hamper and the system falls apart.
10. Keep a Lost Sock Bin
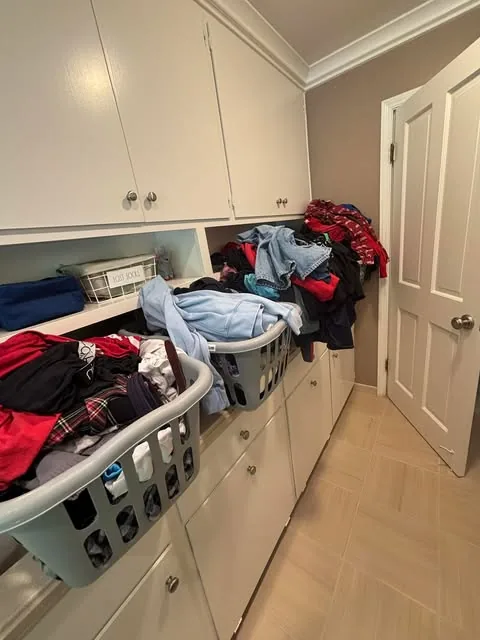
Even on the messiest laundry day, with baskets piled high and clothes spilling over the sides, one small thing can stay in order: the lost sock basket.
Here it’s a little white wire basket on an open shelf, with a sign on the front. Every single sock goes in there instead of back into the pile or onto the floor.
Why it helps:
- Single socks stop getting rewashed again and again
- Matching pairs takes a few minutes once the basket fills
- Kids know exactly where to look before saying a sock is gone
Keep it at eye level. A basket up high or behind a door gets forgotten.
📌 Good To Know
Wash small socks in a zippered mesh bag, one bag per person. Pairs come out of the dryer together, and far fewer end up in the lost sock basket at all.
11. Mount a Fold-Down Drying Rack
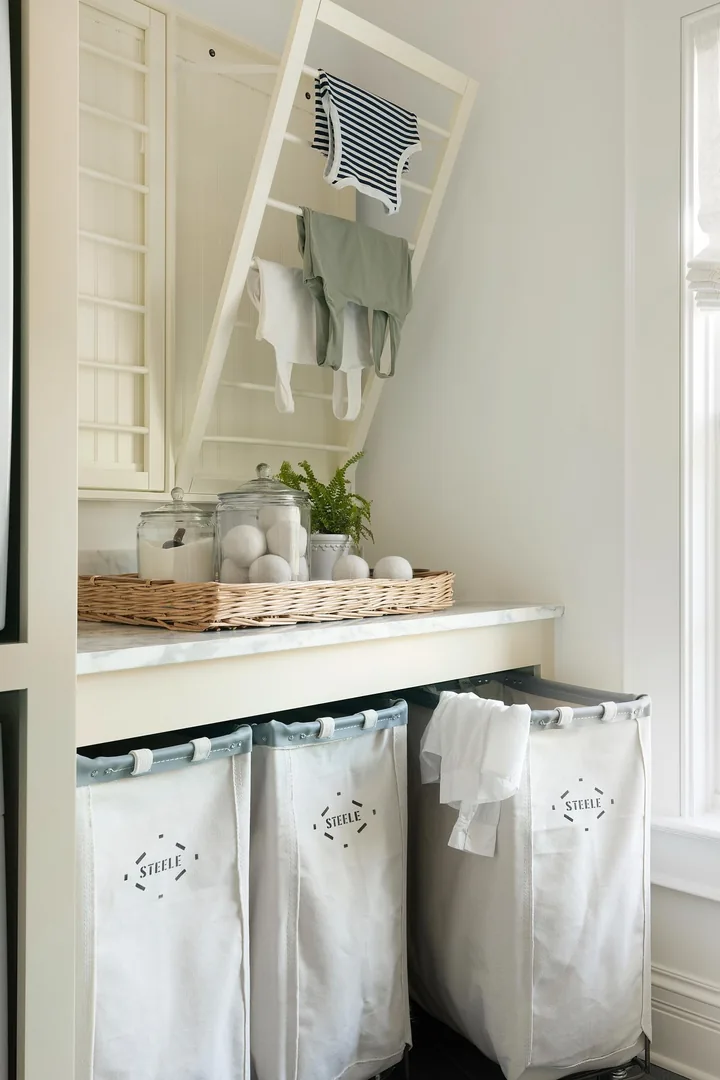
When you’re done, it folds flat against the wall and almost disappears. That’s the whole point of a fold-down rack.
This one opens out of a shallow wall frame and tilts forward just enough to hang a load of small things. Here it’s holding tiny baby clothes, but swimsuits, socks, and workout tops fit just as well.
Set it up so it works:
- Mount it above the counter, so drying and folding happen in the same spot
- Hang it high enough that you won’t bump your head while folding underneath
- Paint the frame to match the wall so it blends in when it’s closed
Wring clothes out well first, or lay a towel on the counter below. Drips add up.
12. Store the Ironing Board on the Wall
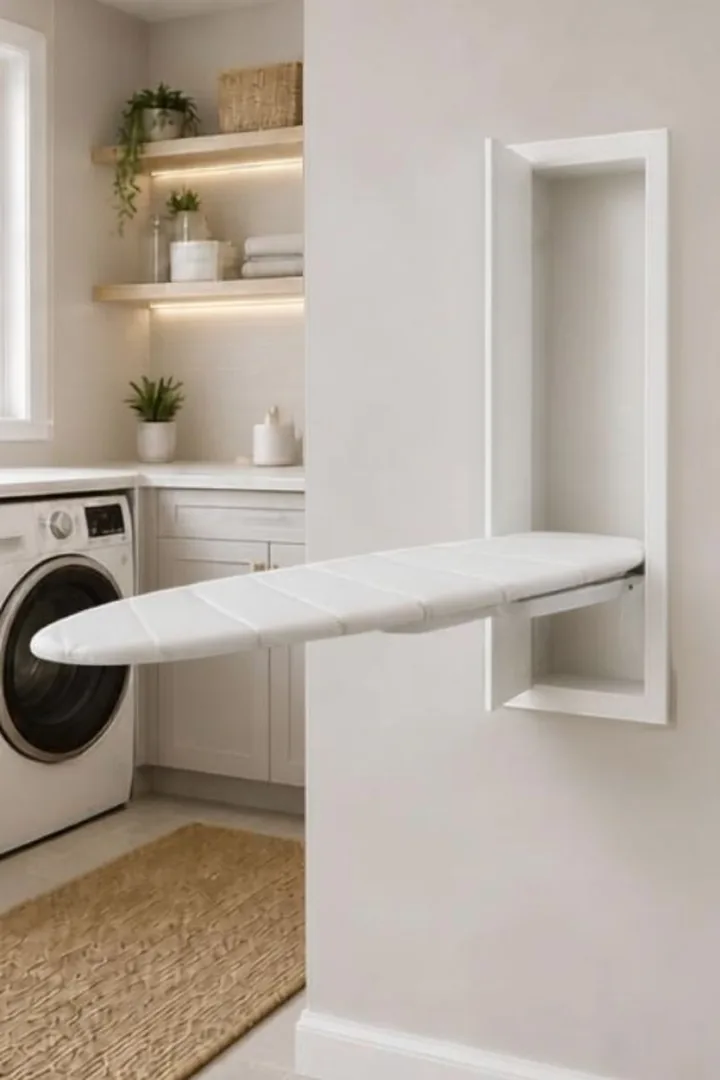
A clean white board swings out of a slim cabinet set right into the wall. When the ironing is done, it folds up, the door closes, and the wall goes back to being a wall.
A built-in board like this fits between the wall studs, so it suits a remodel or new build. In a finished room, a cabinet that mounts on the wall surface does the same job with less work.
Where you put it matters:
- Close to an outlet, so the iron cord reaches without a stretch
- Near the dryer, so clothes go from machine to board in a few steps
- Out of the path of any door that swings open
Check the height before you install it. The board should sit near your waist so you’re not hunched over.
- ▸A heat-safe hook or shelf: for the iron, but only once it has fully cooled.
- ▸A small spray bottle of water: for stubborn creases.
- ▸A thin pressing cloth: to lay over dark fabrics so they don’t get shiny.
- ▸A spare board cover: folded flat on the cabinet floor for when the old one scorches.
13. Hide Clutter Behind a Curtain
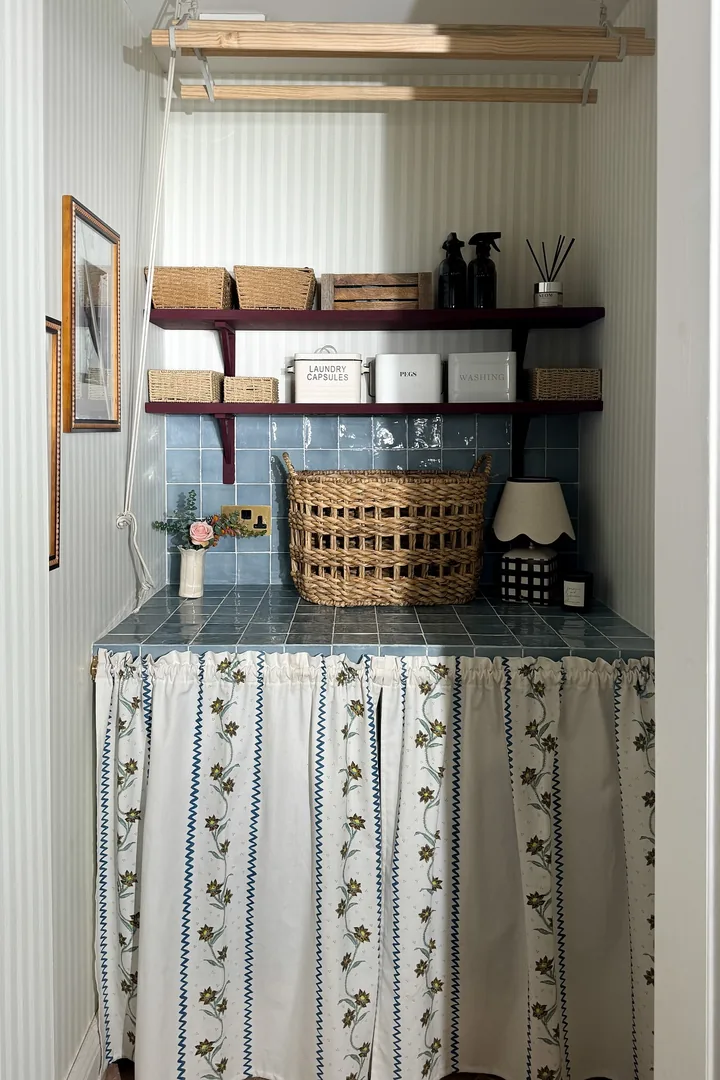
Cabinet doors hide the machines, but they cost more and need careful fitting. A curtain does the same job for much less, and you can swap it whenever you want a new look.
This alcove uses a gathered skirt hung under a blue tiled counter. The pattern does the hiding. Busy vines and wavy stripes catch the eye, so nobody thinks about the washer behind them.
The rest of the nook works with it:
- Deep red shelves that stand out against the blue tile
- Woven baskets and labeled canisters for supplies
- A wooden drying rack on a pulley, raised to the ceiling when it’s not in use
Choose a fabric you can throw in the wash. It lives in a room full of lint, after all.
Use two panels that part in the middle, so you can reach either machine.
Wash and dry the fabric before you hem it. Cotton can shrink.
Hang it from a curtain wire or slim rail fixed just under the counter edge.
Thick, heavy fabric that traps damp air around the machines.
Sheer fabric that lets the machines show right through.
A curtain hung so close that it gets caught in the washer door.
14. Label Every Shelf and Bin
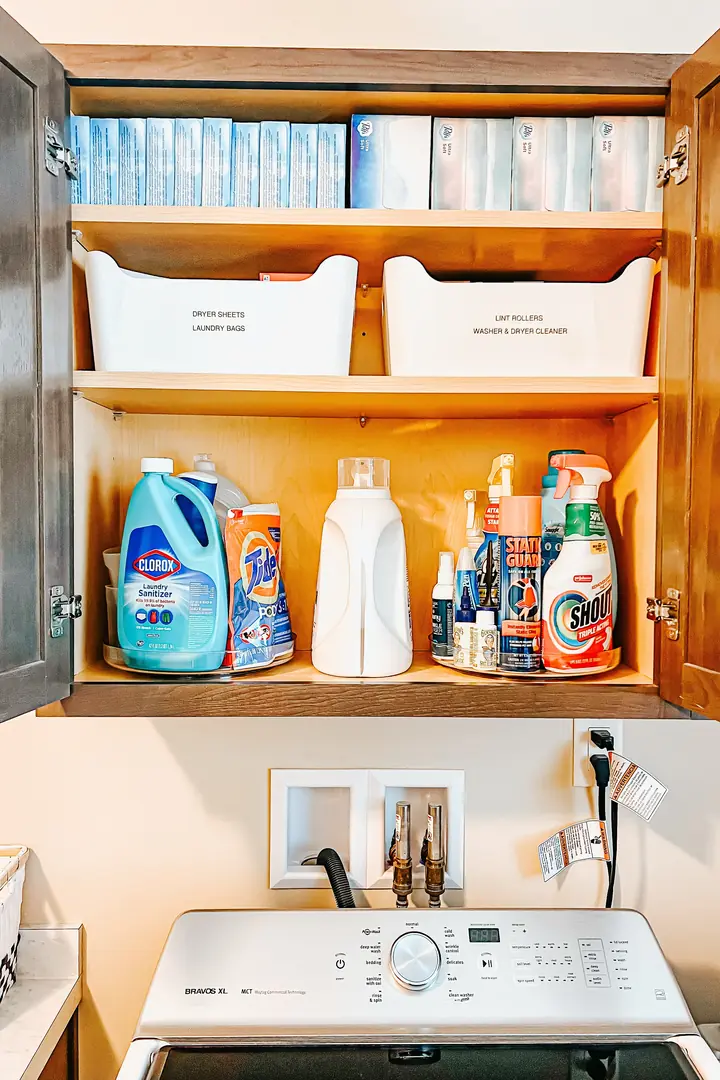
Here’s the rule: if it doesn’t have a label, it doesn’t have a home.
Labels turn a cabinet into a system anyone in the house can follow. In this one, each white bin names two things, like dryer sheets with laundry bags, or lint rollers with washer cleaner. Pairing things that get used together keeps the number of bins low.
A few tips:
- Use plain black type on white labels. You can read them from across the room.
- Put labels on the front of the bin, not the lid.
- Line up backup boxes on one shelf, so you can see at a glance when stock runs low.
This cabinet hangs right above the washer, so everything is one reach away.
What to label first
15. Make a Stain Kit in a Caddy
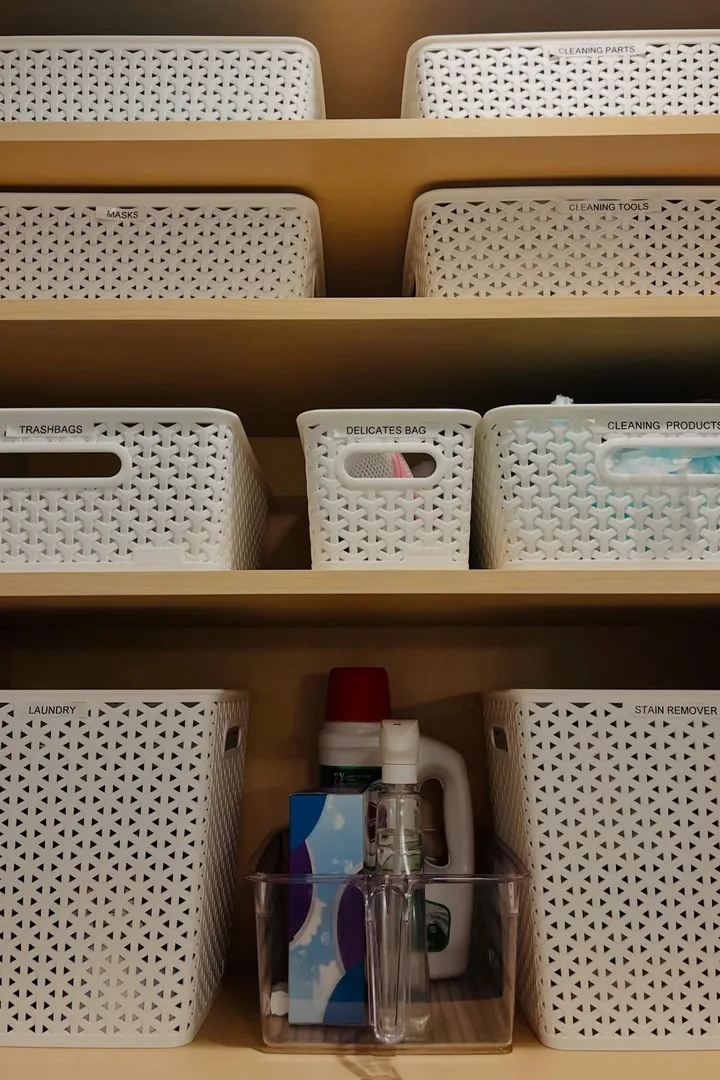
Spaghetti sauce lands on a white shirt at dinner. By the time you’ve found the stain spray, the brush, and a clean cloth, the sauce has had plenty of time to soak in.
A stain kit keeps all of it in one clear caddy with a handle. Grab it, carry it to the shirt, and treat the spot right away.
Why a caddy works better than a shelf:
- The handle lets you carry everything in one trip
- Clear sides show when a bottle is almost empty
- It slides between bins on a low shelf, easy for anyone to grab
Check the spot again before it goes in the dryer. Heat can set a stain that hasn’t fully lifted.
16. Add a Lazy Susan to Deep Cabinets
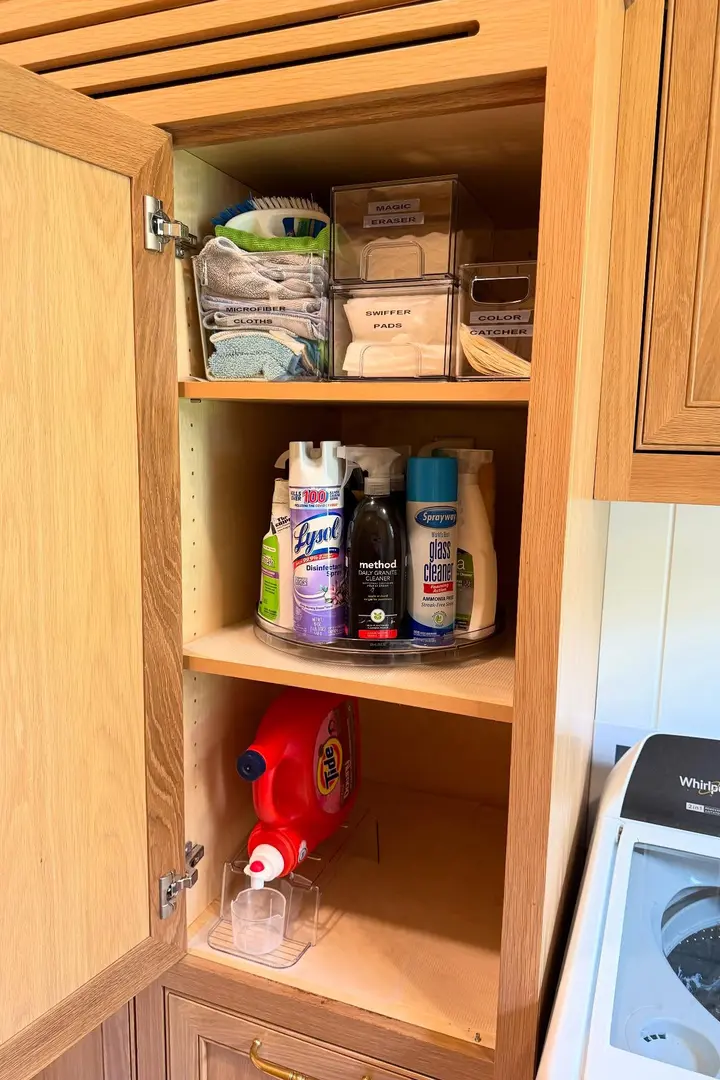
Deep cabinets swallow things. The spray you need ends up at the very back, behind three bottles you don’t.
A clear turntable fixes that with one spin. Set your sprays on it, and any bottle comes to the front in a second. No reaching past things, and no knocking them over.
The rest of this cabinet works the same way:
- Clear stacking bins up top for cloths, mop pads, and sponges, each one labeled
- A turntable in the middle for all the sprays
- A clear stand on the bottom that holds the big detergent jug on its side, spout out, with a cup underneath to catch drips
Measure the shelf before you buy. The turntable needs to spin without hitting the door hinges.
| On the Turntable | On the Plain Shelf | |
|---|---|---|
| Best for | Sprays and tall bottles you grab often | Big jugs, stacked bins, and boxes |
| Why it works | One spin brings the back row forward | Stays steady under heavy weight |
| Skip it for | Heavy jugs that tip when it spins | Small bottles that hide behind each other |
17. Create a Hanger Station
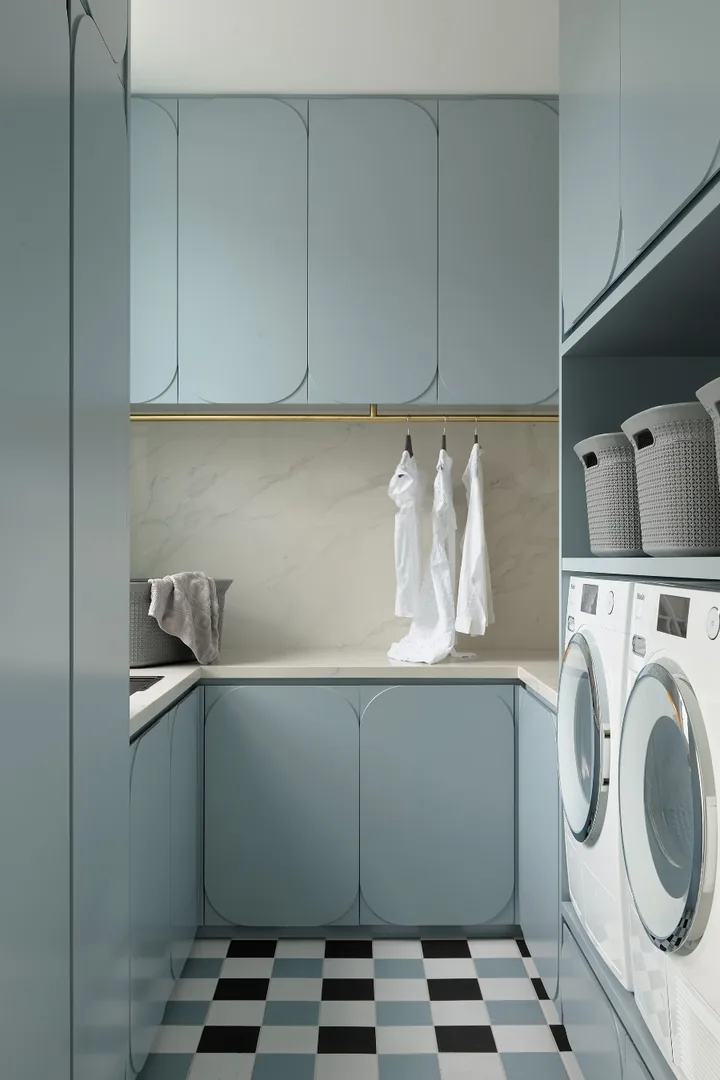
A thin brass rod runs under the upper cabinets, right above the counter. Three white shirts hang there, fresh from the dryer, ready to go to the closet.
That’s a hanger station, and it keeps shirts out of the wrinkled pile. Pull each piece out of the dryer, hang it right away, and carry the whole row to the closet in one trip.
To make it work:
- Mount the rod high enough that shirts hang free of the counter
- Keep a stack of empty hangers at one end of the rod, ready to grab
- Use matching hangers so the row looks neat even when it’s full
Brass looks warm against soft blue cabinets, but plain chrome suits any color.
Clean shirts dumped in a basket, wrinkling while they wait. Empty hangers tangled in a heap at the bottom of the bedroom closet.
Shirts go on hangers the moment the dryer stops, and spare hangers wait on the rod. One trip carries the whole row away, with far fewer wrinkles to iron.
18. Stack the Machines in a Laundry Closet
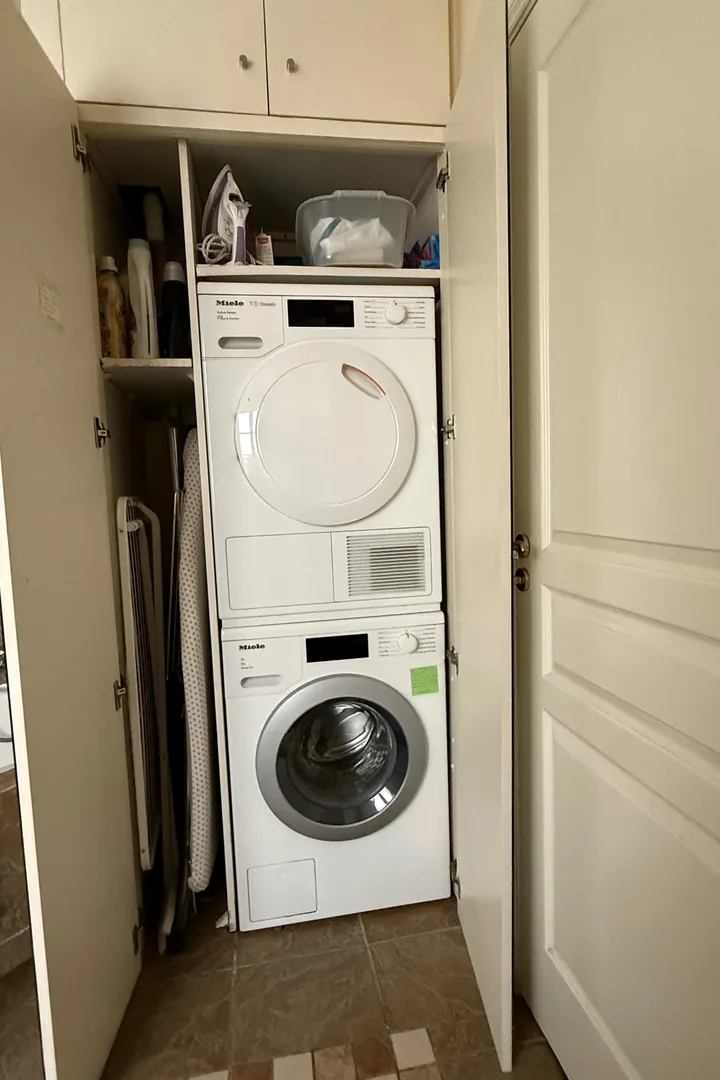
Stack the dryer on top of the washer, and a closet that held one machine suddenly has room for both, plus storage.
Stacking frees up all the width beside the machines, and that’s where the real storage lives. A narrow strip next to the washer can hold shelves, a drying rack, and an ironing board, all behind closed doors.
Before you stack, check that:
- Your washer and dryer are made to stack, and you use the stacking kit meant for them
- You can still reach the dryer controls once it’s up high
- There’s room behind for the vent and hoses
The doors close over everything when you’re done, so guests only see a closet.
Very top: closed cabinets for backups and things you use a few times a year.
Shelf above the dryer: the iron, once it has cooled, and a lidded bin of small supplies.
Side shelves: daily detergent and softener at eye level, where you reach without thinking.
Floor gap: the folded drying rack and ironing board, standing on their edges side by side.
19. Post a Simple Laundry Schedule
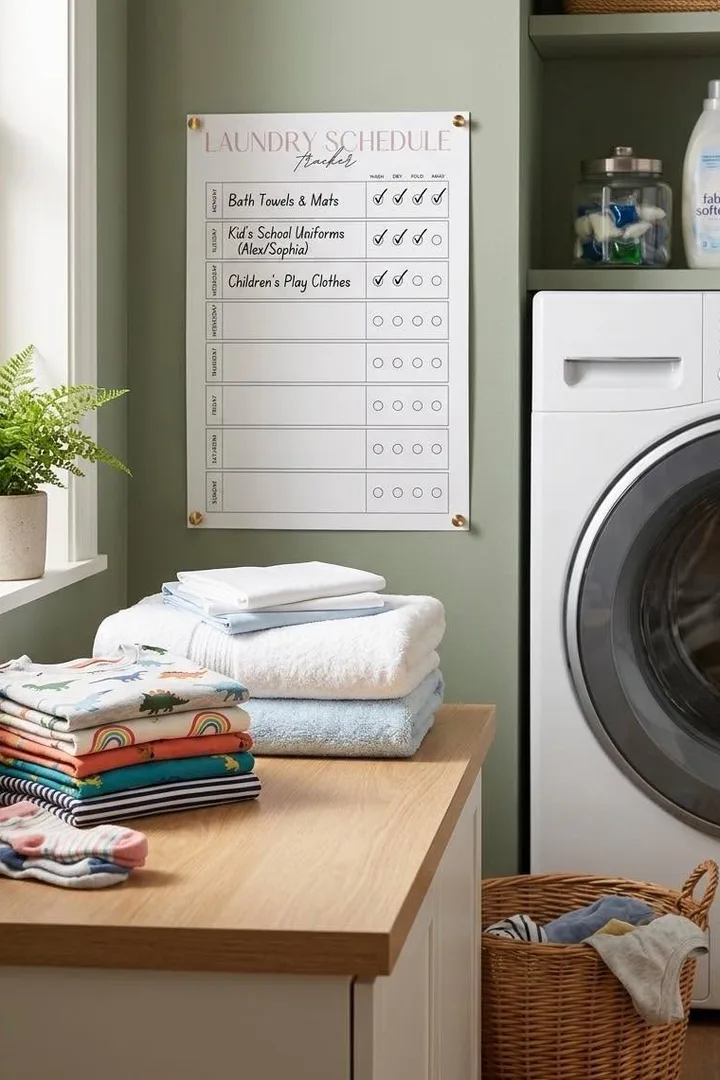
Laundry doesn’t pile up because you’re lazy. It piles up because there’s no plan, so every load waits for someone to decide it’s time.
A schedule on the wall makes that decision ahead of time. Each day gets one job, like towels on Monday and school clothes on Tuesday. Four small boxes track each load from wash to dry to fold to put away.
Why it works:
- One load a day feels small, so it actually gets done
- Anyone can see what’s next without asking
- The checkmarks show where a load got stuck, which is often at “fold”
A clear acrylic board and a dry-erase marker make it easy to wipe clean and start fresh each week.
Keep the schedule loose. If Tuesday’s load slips to Wednesday, move it and keep going. One missed day is no reason to give up on the chart.
20. Light Up Dark Corners
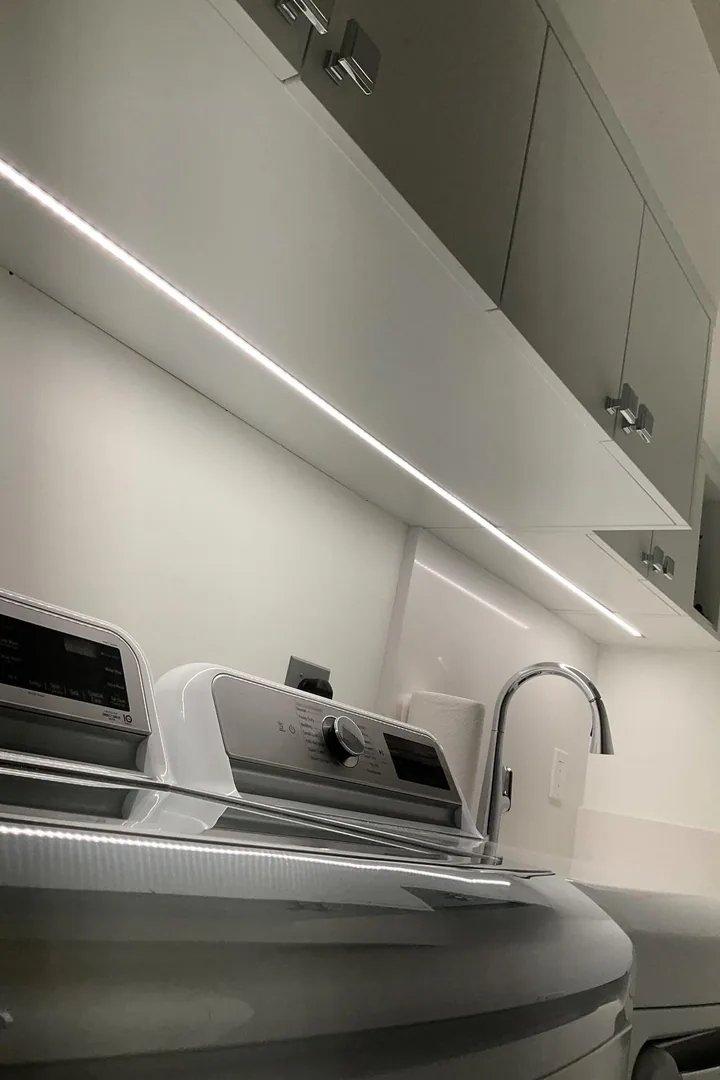
Most laundry rooms get one ceiling light, and it sits behind you. So you stand in your own shadow, squinting at a stain.
A strip of LED lights under the upper cabinets puts the light right where your hands are. This one runs the full length of the cabinets, over the washer and the sink, so the whole counter is lit evenly.
What to look for:
- A slim strip with a cover that softens the glow, so you don’t see every tiny bulb
- Bright, neutral white light, which makes it easier to spot stains and tell navy from black
- A switch near the door, or one you can reach without leaning over the machine
Fold one load under it, and the old ceiling light will feel like an afterthought.
💡 Quick Tip
Plug-in and hardwired strips give steady light along the whole run and never need charging. Battery bars go up faster but are often dimmer. Near a sink, pick lights made for damp spaces, and leave anything hardwired to an electrician.
Start With One Corner
You don’t need a bigger room or a full remodel to make laundry easier. You need a few spots that each do one job: a bin for sorting, a shelf for supplies, a rod for hanging, a basket for each person, and a simple plan for the week.
Start small. Fix the corner that bugs you most, whether that’s the bottles crowding the floor or the pile of clean shirts on the dryer. Then add one more idea next weekend.
That’s really how to organize a laundry room so it stays that way: one small system at a time, until wash day stops feeling like a chore.
Save this list to your laundry room board for the next time a corner needs some help.